- Print
- DarkLight
- PDF
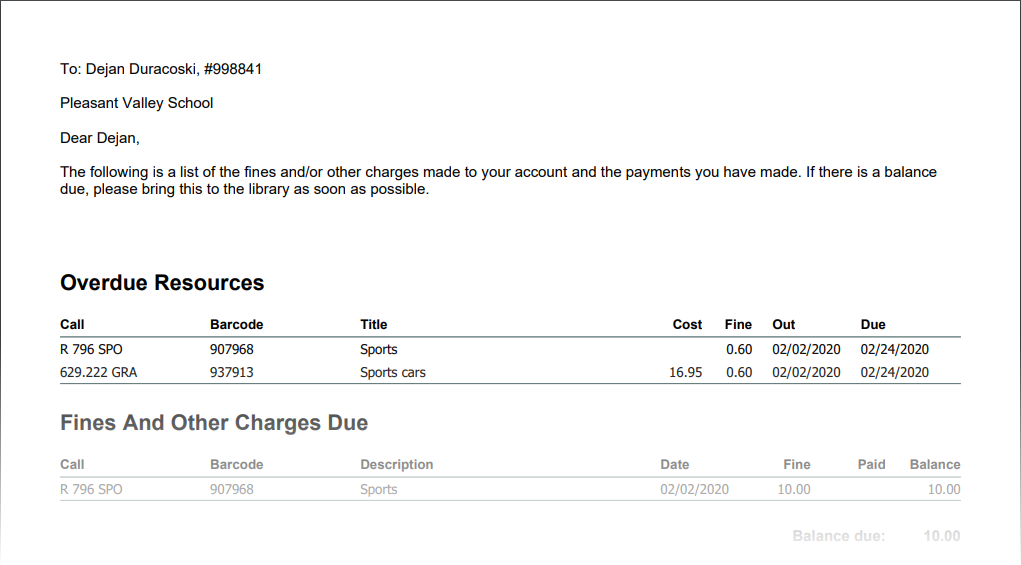
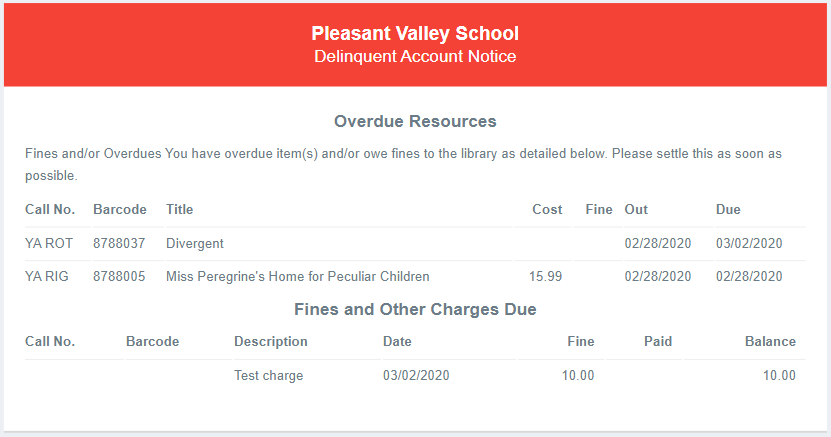
Email or print notices to patrons who have overdue materials and/or have an outstanding fines balance from resources returned late or from other charges. You can think of this as a combination of Overdue Notices and Fines Notices.
Email or print statements showing the detail of all the fines, charges, adjustments, and payments for each patron.
Sample Printed Notice
Sample Email Notice
Step 1 - Select or Create Notice Set
The first step is to select which notice set to use. In many cases, you'll have only one, Standard, and can just go to the next step.
Notice sets are helpful when you want to create different types of notices for different segments of your patron population. See Notice Sets and Recent Paper Notices for more about Notice Sets.
Step 2 - Options
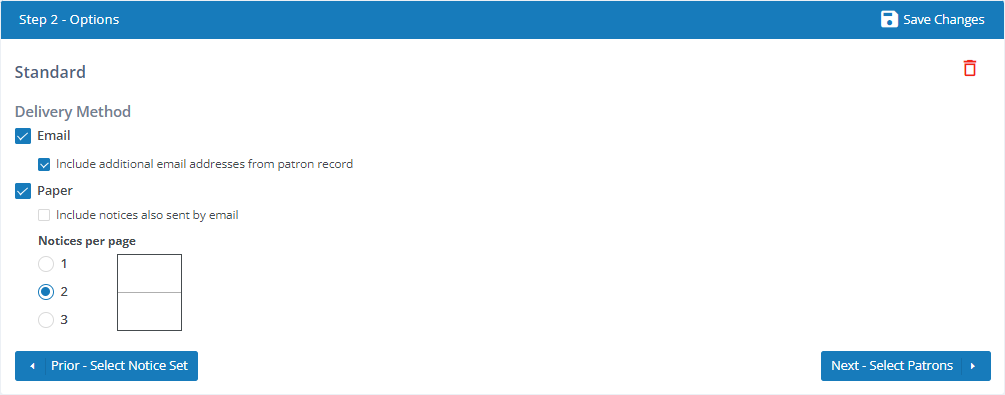
Delivery Method
Email - Send notices by email. When you select this option, notices are sent by email to patrons that have email addresses on file. Email notices are the most convenient because they can be sent on schedule and do not require any staff interaction for printing and delivery.
- Include additional email addresses from patron record - Unless this option is set, email notices will not be created for emails added to the Additional Email for Notices field in a patron profile. Select this option if you want to create email notices for those additional emails.
Paper - Select this option to print notices on paper. If you do not have email addresses for all of your patrons, you'll want to select this option so you get paper notices for those.
- Include notices also sent by email - Unless this option is set, paper notices will not be created for patrons who have email addresses. Select this option if you want to create both paper and email notices for those patrons.
- Notices per page - To conserve paper, you can select to print two or three notices on the same sheet of paper, which is then cut after printing. Guidelines are printed to show you where to cut. Select 1, 2, or 3 to indicate the number of notices you want to print on a sheet of paper.
Options
Show to-date fine amount on overdue notices - Set this if you want to show the amount of the fine that would be charged if it were returned on the date the notice is created.
Show cost of overdue items - If checked, the acquisition cost (if known) will be included in the notice.

It is not necessary to click the Save Changes button as you move from one step to another. Your changes are saved automatically when you go to the next step. The Save Changes button is useful when you don't need or want to go to the next step but just want to set up a schedule and/or make some changes and leave.
Step 3 - Select Patrons
The next step is to select which patrons you want to receive notices, using either Basic or Advanced record selection options. See Selecting Records for Patron Reports for detailed instructions.
In most cases, just select All Patrons and skip forward to the next step. You don't need to do anything special to create notices only for patrons who have a fines balance due or who have overdue resources. Surpass Cloud will handle all of that for you.
You will use this when you want to include or exclude certain patron types from receiving notices. This is most useful when you are creating multiple Notice Sets to tailor the language and options for the notices to different segments of your patrons.
Step 4 - Notice Text
This is where you can customize the text that appears at the top of every delinquent notice.
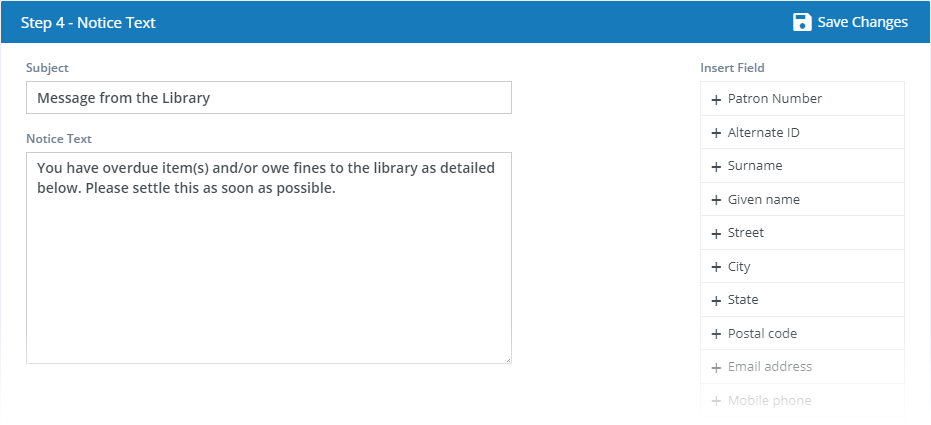
Subject - The subject heading to be used for emailed notices.
Notice Text - The text of the notice. Enter the text you want to appear above the list of outstanding charges and overdue items. Click patron fields from the list on the right side of the page to insert placeholders for patron data that will be filled in when the notice is created.
The header with patron name, number, etc. that is printed at the top of all printed notices can be edited in Settings : Patrons : Notices. You do not need to include that here. If you mail notices, you will likely want to include the mailing address on the printed notice header so it can appear in a window envelope.
Inserting Patron Fields
While editing the text, move your cursor to the place where you want to include a patron field, then click the corresponding field from the list on the right side of the page. You can remove a field from the text by simply deleting it or typing over it as you would any text.
{Surname} means the patron's surname (last name) will appear in this place. If you make any changes to these placeholders, Surpass Cloud will no longer recognize them and will print them in the notice text verbatim.You can also edit notice text on the Settings : Patrons : Notices page.
Step 5 - Schedule
If your library creates delinquent notices on a regular basis, the most convenient method is to have Surpass Cloud create them for you automatically on the day(s) of the week you select. Of course, you can also opt to email and/or print them manually regardless of whether you have them set to be created on schedule.
- Create notices automatically - Check this box if you want notices to be created automatically, then check the boxes next to the day(s) of the week you want to create notices. The notices will be created sometime between midnight and 5:00 AM on those days. Emailed notices are sent at that time and paper notices are created and saved so that you can print and deliver them at your convenience.
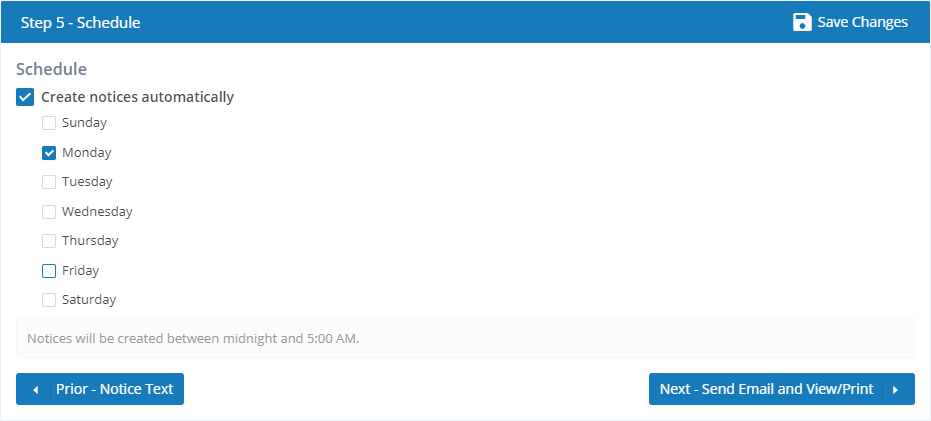
Each time delinquent are created, they are created for everyone who has an outstanding fines balance or overdue items, regardless of whether the patron has already been notified. To prevent patrons from getting the same notice every day, it's usually best to select to send these only one or two days per week.
If you have selected to create notices automatically according to schedule, you don't need to go to the next step unless you want to also create notices immediately. Just click the Save Changes button to save your schedule and go on your way. The notices will be created on the day(s) you selected. Later, you'll find the paper notices (if any) listed on this page for you to download or print, listed under Recent Paper Notices. These notices will be available here for 7 days.

Step 6 - Send Email and View/Print
If you are creating notices immediately instead of on a schedule, there is one more step: sending email and/or viewing and printing notices. The functioning of this step depends on which delivery method(s) you selected in Step 1.
If your notices include paper notices, they will appear in a preview window. The report can be viewed on-screen, printed, or downloaded as a PDF. See Viewing and Printing Reports.
If you had any notices to email, you'll receive information about the number of notices queued for delivery.
All notices sent by email or paper are recorded in the Notice History panel on the Patrons : View page.
If your library is part of a system that has multiple locations or branches, the notices will be sent to patrons in the selected location only, regardless of whether you have the All Locations option selected.


