

Surpass Cloud can import MARC records provided to you by vendors when you purchase resources. You might also use this feature to import MARC records from your prior library management system, or perhaps to re-import MARC records originally exported from Surpass Cloud and sent to a third-party for cataloging enhancements.
If you have resource records in a format other than MARC records, such as a spreadsheet, contact Surpass Software for data conversion services. You can also use third-party, do-it-yourself, tools such as MarcEdit to convert your records into MARC format.
If you have exported your records for updating for cataloging enhancement, bulk editing, or other purposes, see Re-Importing Exported MARC Records for important information on how to set the options.
A video that shows how to select settings for importing MARC records is available on YouTube: Importing MARC Records Part 1
Step 1 - Set Options
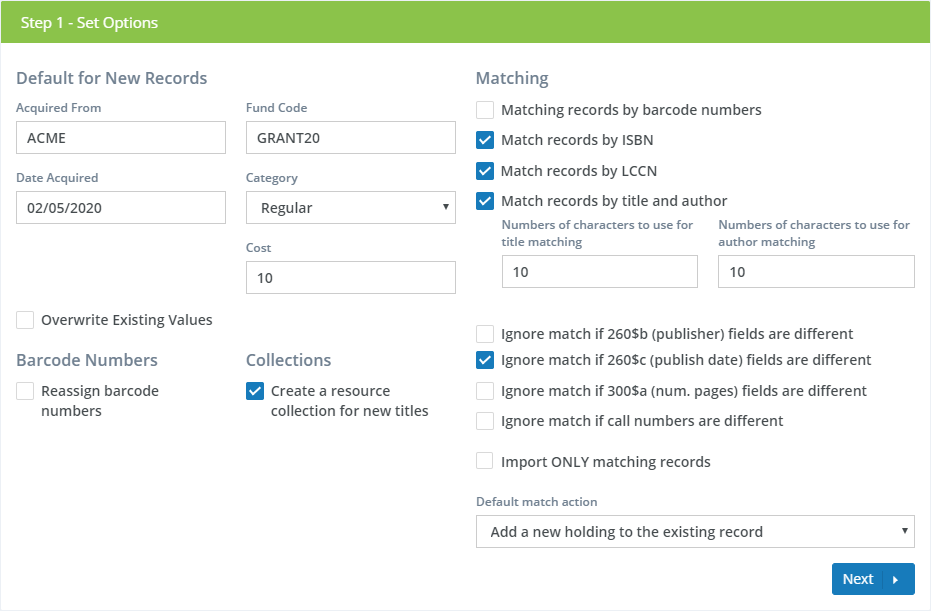
Defaults for New Records
The defaults for new records are applied to corresponding MARC fields whenever there is not already other information in the fields.
-
Acquired From - When importing records purchased from a particular vendor or other source, enter a code for the vendor or select a previously used vendor code from the drop-down menu. For reporting purposes, you'll want to be sure that the vendor codes you use remain consistent. You can leave this field blank if you don't use or track vendor codes.
-
Fund code - When importing records purchased with funds from a particular source, enter a code for the funding source or select a previously used fund code from the drop-down menu. For reporting purposes, you'll want to be sure that the fund codes you use remain consistent. You can leave this field blank if you don't use or track fund codes.
-
Date Acquired - The acquisition date of the items. For new items, this is usually today's date. This date will be applied to all records you import that don't already have another acquisition date specified (normally in field 852$d).
-
Category - Select a Resource Category from the drop-down menu to assign all MARC records in the file to that category. Select Automatic to assign categories based on the call numbers of the imported records. See Automatic Category Assignment below.
-
Cost - If your MARC records do not include cost information (typically in MARC Field 852$9), this value will be used to set the cost on the holdings imported. You might want to use this to set an average replacement cost for the resources you are importing.
If your MARC file was exported from Surpass Cloud or Surpass Central for Windows, the category, acquired date, fund, vendor, and cost will be included in that file and will be imported.
- Overwrite Existing Values - Normally, new record default values are applied to imported records only when there is not already other information in those fields. However, when this option is checked, the new record defaults (vendor, fund, category, location, acquisition date, and cost) will overwrite whatever is already in the records being imported.
The Overwrite Existing Values option can be very helpful as a tool to mass-update the categories in your resource records. Just export all the records you wish to update, then reimport them using this setting and the category. Make sure to use the appropriate match and replace settings so that your existing records are updated.
Barcode Numbers
Normally, the MARC records you import will include barcode numbers. However, if there is no barcode information in the records, or the incoming record's barcode is in a different MARC tag subfield, then barcode numbers will automatically be assigned based on the next highest number.
- Reassign barcode numbers ... starting at - If you select this option when importing, Surpass Cloud will ignore any barcode numbers in the records and assign new barcode numbers starting with the number you supply. If the starting number you chose or one of the following numbers to be assigned is already in use, Surpass Cloud will advance to the next higher available number and continue from that point on. Note that the Reassign Barcode feature defaults to the barcode value in the Next Auto-Assign Barcode feature. This feature can be found in Settings : Resources : General.
Collections
- Create a resource collection for new titles -- Select whether or not to add the imported items to a new Resource Collection. Each time resources are imported with this option enabled, a new resource collection named "Resources Imported" (along with a date/time stamp) is created. All imported resources, whether added titles, added copies, or replaced MARC records, are added to the collection. The list of items can then be found in Resources : View by a Resource Collection search, or by using a resource collection in Custom Resource Reports.
Matching
When you import new records, Surpass Cloud normally attempts to find matching records in your existing database so that multiple holdings of the same item are linked into one MARC record. The options in this section determine how and if that happens.
-
Match records by barcode number - This option tells Surpass Cloud to find matches by comparing the barcode numbers of items being imported to barcode numbers of items already in the system. This option is not normally useful for importing new records, but it is helpful if you have sent your records out for processing or cleanup, and you are now importing in order to replace your existing records.
-
Match records by ISBN - This option tells Surpass Cloud to find matches by comparing the ISBNs of imported items to those of resources already in your database. This is the most useful type of matching for importing new records. Assuming that ISBNs are included in both records, ISBN matching is a much more accurate method of matching than title and author.
Surpass Cloud ignores all punctuation in ISBNs for searching and sorting. Furthermore, it ignores all but the first 10 digits (and 'X' character if used). This is very helpful because in some databases, ISBNs are recorded using a variety of formats – sometimes hyphens are used as punctuation, sometimes spaces, are used and sometimes there is no punctuation in the ISBN at all. None of these discrepancies will prevent ISBN matches in Surpass Cloud.
-
Match records by LCCN - This option tells Surpass Cloud to find matches by comparing the LCCNs of imported items to those of materials already in your database. LCCN matching is similar in accuracy to ISBN matching.
-
Match records by title and author - This option causes Surpass Cloud to look for matches by comparing the titles and authors of imported records with those of existing records. This is less accurate than ISBN matching, especially for series titles that might have the same author and many matching titles.
Title and author matching is often inexact, as there may be typographical discrepancies which prevent automatic matching between your existing records and the imported records, or there may be records in your database which have the number of matching characters you specified but are not a true match. When using title and author matching, it is critical to use the Preview & Approve step of the import process to make sure that individual matches happen correctly.
-
Number of characters to use for title matching - The number you enter here specifies the minimum number of characters of the titles that must be identical to be considered a match. For example, if you enter 10 here, the titles will be considered to be matching if the first 10 characters of each title are identical. Entering a number that's too low will result in too many false matches. Entering a number that's too high might result in Surpass Cloud missing some matches due to spelling or punctuation differences.
-
Number of characters to use for author matching - The number you enter here specifies the minimum number of characters of the author names that must be identical to be considered a match. This works in the same way as title matching.
If Surpass Cloud finds more than one match, it automatically selects the one that has the most matching characters. For example, it might find a series of a dozen books that have the same first 10 characters in the titles and in the authors. Of that dozen, it automatically selects the book with the highest number of matching characters in the title and author.
-
Ignore match if 260b fields are different - If you check this option, then the number of characters that you specify must match in MARC field 260$b (publisher) in both records.
-
Ignore match if 260c (publish date) fields are different - If you check this option, then MARC Field 260$c (copyright year) must contain the same number in both records to be considered a match.
-
Ignore match if 300a (num. pages) fields are different - If you check this option, then MARC Field 300$a (number of pages) must contain the same number in both records to be considered a match.
-
Ignore match if call numbers are different - If you check this option, then the call number of the imported and existing records must be identical for the records to be considered a match.
-
Import ONLY matching records - When this option is checked, non-matching records will not be automatically approved for import. However, you can manually approve them in the Preview & Approve step of the import process.
-
Default match action - This option tells Surpass what to do with the imported record if it finds that it matches an existing record. You can change this for individual records in the Preview & Approve step of the import process, but this action will be the default for all matching records. The choices are:
-
Add a new holding to the existing record - A new holding is added to the existing record. Except for the addition of the holding, the original MARC record will remain unchanged. This is the most common way to handle matches.
-
Add holding and replace existing information - A new holding is added to the existing record and the existing record's MARC information is replaced with the new record. This match action is useful when your existing records are not complete or if the imported records might contain more up-to-date cataloging information.
-
Add as a new title - The imported record will be imported as a new, separate title and the existing record will be untouched. Essentially, this tells Surpass Central to ignore the match.
-
Replace existing information - The existing record's MARC information is replaced with the imported record. No holdings are added. This match action is useful when you have done processing on your existing records outside of Surpass Cloud and want to update your MARC record with the new information. This option is used most often with the "Match records by barcode number" matching option (described above). You can also specify whether or not to update the local holdings information in your existing records.
-
Skip record without doing anything - The matched record is ignored and not imported. The original existing record remains unchanged.
-
Delete existing record - The matched record is not imported, and the record from your database that is matched is deleted or changed to withdrawn status, depending on whether there is any circulation history. This is only used in special circumstances when you want to mass-delete/withdraw a large number of MARC records from your database. To do this, you can export a MARC file with all the records you want to delete, use the "Match records by barcode number" option (described above), and then import with this match action to delete/withdraw them all.
-
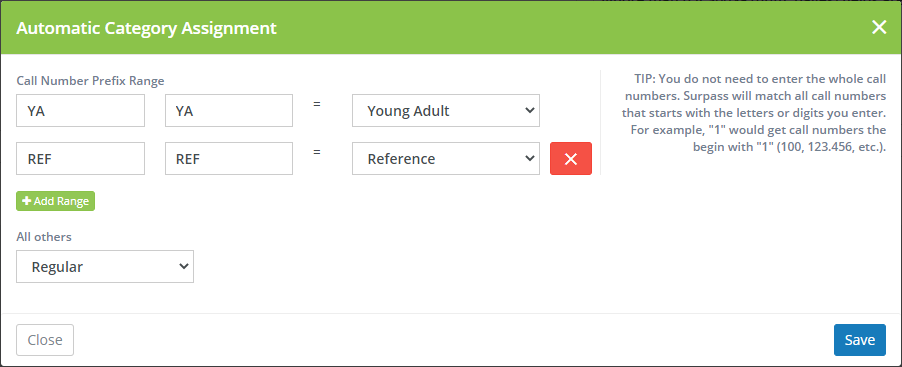
Automatic Category Assignment
Surpass Cloud can assign categories automatically based on the call numbers of the imported records. Select Automatic for the Category option to bring up an Automatic Category Assignment form. Here, you can add call number ranges and the category to which you want to assign resources with call numbers that fall within that range. Click the + Add Range button to add additional ranges and the X button to delete a range. Imported resources with call numbers that don't fall within any of the ranges will be assigned to your selection for All others. Click the Save button to save your settings. These will be stored for the next time you import resources.
To get back to this form, click the ... button on the right side of the Category input.
If your library is part of a system that has multiple locations or branches, records will be imported into the selected location at the top of the page.

Recent Reports
Here you can find up to the last 10 reports that have been completed. You can view the report by clicking on the row of the report you wish to view. This view is the same you find on Step 4 - Import Summary.

Step 2 - Upload File
The next step is to upload the MARC file to import.