
Step 3 - Preview and Approve
This the third step in the import process allows you to preview and approve the records to be imported. The records are loaded from the file you uploaded, then a complete listing of all of the titles from the file you opened is shown. You can view individual records either in a basic, abbreviated form, or in full MARC view. You should take advantage of this step of the import process to make sure that the matches automatically found by Surpass Cloud are valid. You can make changes to the way matches are handled, or control whether or not individual records will be imported. This step is critical when matching by title and author, since all of the desired matches may not happen automatically due to typographical discrepancies, or incorrect matches may occur.
Since no changes take place to your Surpass database up to this point, this is great way to view the contents of a file containing MARC records. If you are only previewing the file and do not intend to import, though, just be sure not to proceed to the next step of the import process so that your database is not actually updated.
The Preview & Approve step consists of four basic elements: the Filter and View controls at the top, the Record List in the bottom pane which shows all records processed from the file you uploaded, the Imported Record display in the upper-left pane which shows the currently selected record from the record list, and the Matched Record display in the upper-right pane which shows the existing record from your database (if any) that was matched with the currently displayed record. You can use the splitter bars and hotspots to resize or hide the panes according to your liking.

Controls
-
Filter - Select whether you want to see All records, Matches Only, or Non-Matches Only in the list. In long lists, this helps you focus on the ones you are most interested in.

-
View - Select whether you want to see a Basic view or the MARC record view of the selected imported and matched records at the top of the page.

-
Cancel - A Cancel button appears on the top-right corner of the Preview and Approve panel. Click Cancel if you don't want to go further in the import process.
-
Approve All - Click this button to approve all records in the list for import, regardless of their matching status. For records that were originally skipped, using Approve All will approve them for import and suggest an import action.
Matching the Imported Records
Once the file you have opened is loaded and processed, then your job at this point is to preview the records to be imported and to make sure that the matches are valid. You do this by scrolling through the record list and, if necessary, checking or unchecking records and/or changing the match actions. This is probably not necessary if you are using a precise matching criteria such as ISBN or barcode – usually only when you are matching by title and author. Remember, title and author matching is often inexact, as there may be typographical discrepancies which prevent automatic matching between your existing records and the imported records, or there may be records in your database which have the number of matching characters you specified but are not a true match. In these cases you will have to assign matches manually.
Color Coding
The record list, in the bottom pane of the page, shows all records processed from the file you opened. Loaded records are automatically matched (or skipped) depending on the matching options you chose on the Set Options step. Records that were not matched but were approved and will be imported normally are shown in the list in white. Records for which Surpass Cloud has found matches and are approved for import are highlighted in the record list in green. Records for which a match could not be made are highlighted in pink. You can use the Filter menu in the toolbar to control whether all records are shown, or if only the matched or non-matched records appear.
Previewing Records
When you select any record from the list, then it is shown in the imported record display, found in the upper-left pane of the page. If it is matched with any existing record in your Surpass database, then the matched record is shown in the matched record display in the upper-right pane. You can change the way the record detail is displayed with the selected View.
Approving Records
A record is approved for importing if there is a check mark in the Approved column. If you don't want to import a record, then simply uncheck this column. If you have unchecked several records but then change your mind, you can click the Approve checkbox at the top of the column to approve all records for import.
Handling Matches
The Match on column tells you how the match (if any) was found. Title means that the title and/or author fields matched, Barcode means that the barcodes matched, ISBN means the match was on ISBN, LCCN means the match was on LCCN, and (Above) means that there was more than one holding of the title above in the file (usually meaning you purchased multiple copies).
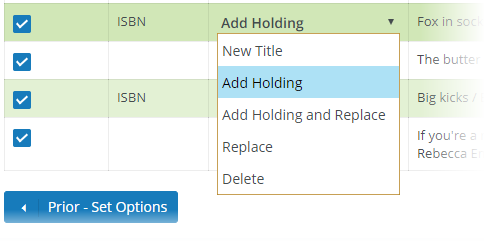
The Action column tells how the match will be handled. The action that Surpass Cloud selects is based on the default match action that you chose on the Set Options step. For each individual record in the list, you can select from a drop-down menu with the following options:
-
New Title - The imported record will be imported as a new, separate title and the existing record will be untouched. Essentially, this tells Surpass to ignore the match.
-
Add Holding - A new holding is added to the existing record. Except for the addition of the holding, the original MARC record will remain unchanged. This is the most common way to handle matches.
-
Add Holding and Replace - A new holding is added to the existing record and the existing record's MARC information is replaced with the new record. This match action is useful when your existing records are not complete or if the imported records might contain more up-to-date cataloging information.
-
Replace - The existing record's MARC information is replaced with the imported record. No holdings are added. This match action is useful when you have done processing on your existing records outside of Surpass Cloud and want to update your MARC record with the new information.
-
Delete - The matched record is not imported, and the record from your database that is matched is deleted or changed to withdrawn status, depending on whether there is any circulation history associated with it.
Barcode Conflicts
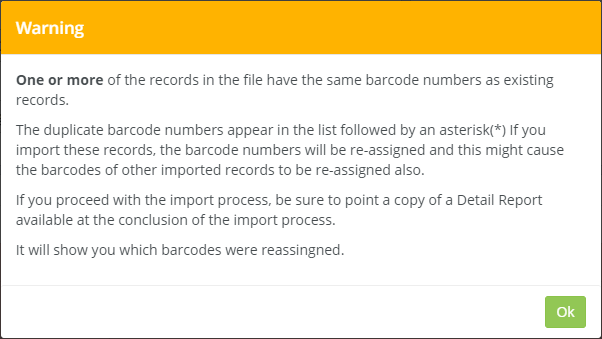
Before the Preview and Approve page is shown, you might see a warning message to let you know that some of the resources you are importing have barcode numbers that conflict with your existing records.
Step 4 - Import and View Reports
After you have made your approval and matching choices, click the Next button to go start the final step of the import process, Import and View Reports.